- Create your own website easily
- Dozens of nice graphic layouts to choose from
- Insert and manage menu items
- Inserting and updating texts and images
- E-mails
- File Manager
- Stock photos
- Search engine optimisation
- Websites accessible even in Firefox, Opera, Safari
- Speed
- Language support
- Photo Galleries
- Site map
- Articles
- Fulltext search
- Guestbook
- Show content from
- Redirect
- Feedback Form
- Product catalog
- Import Microsoft Excel data
- Shopping cart
- Order form
- Polls
- Pages visible for logged-in users
- Page Lock
- User Administration
- User Groups
- User Registration
Inserting and updating texts and images
How to insert text to the webpage?
- Create a "New Page" and select "Text editor" as the main block.
- After clicking on "Create" a pre-defined "Text editor" Object will be shown.
- Enter the text and save it.

Updating texts
|

Updating texts and Images
|

Text formatting
|
Other possibilities of working with the Text editor:
You may set the Image layout in the "Images" tab. Before moving to the Images tab make sure you have saved all the changes made in the Text editor!
Inserting hypertext links
- Enter the link text in the Text editor.
- Select the text with your mouse (highlight it)
- Click on the "Insert/Edit Link" (5th button from the right)
- In the window named Link Type leave a default type of URL link, select the correct protocol, enter the URL address and click "OK".
Working with FLOX links
With this instrument you are able to create hypertext links internally within the web. The procedure is similar as to the creation of a classical hypertext link.
- Enter the text - the reference
- Highlight the text with the mouse
- Click on the button "Insert/Edit FLOX Link" (6th button from right)
- All menu items will be shown in the Insert internal link window - in the form of an URL identifier (with a hyphen)
- Click on the selected item that you wish to link to and click "OK"
Possibilities of using FLOX links:
- You may create a single General Business Terms page and you will display its link on all subpages.
- If you create hidden pages with functional URL addresses these will not be shown in the web menu. You may enter a text on one page referring to more hidden pages and you make links to it.
- Caution: if you change the URL identifier on a site to which FLOX links refer to, re-edit all FLOX links again, because these will remain invalid.
Inserting anchors into the text
What is an anchor? Anchors are used to create a reference within one site. At the top of the page you may place, for example, a list of products that you are going to specify below in the text. The client is interested in a specific product from the list. He clicks on its name and the page will show the part where the product is described - there is no need to scroll down uselessly.
How to create an anchor:
- First, insert the whole text into the text editor. The anchor is used mainly to arrange longer texts.
- Create "clues" at the top, at the beginning of the text, for example: a product list or a list of frequently asked questions.
- Move lower with your mouse to the name of the first product. Here you are going to insert the anchor.
- Click on the "Insert/Edit Anchor" icon.
- As the name of the anchor enter the name of the first product - with dashes and without diacritics (or for example: anchor1, anchor-2, etc.) The icon of the anchor will be created in the text.
- Go to the top of the page, to the list of products or questions and use the mouse to highlight the name of the product you are working with.
- Click on the "Insert/Edit link" icon.
- As to the link type select "Anchor on the current page". Select the anchor - according to the anchor name (select the product name to which the anchor has now been created, from the roll-down menu).
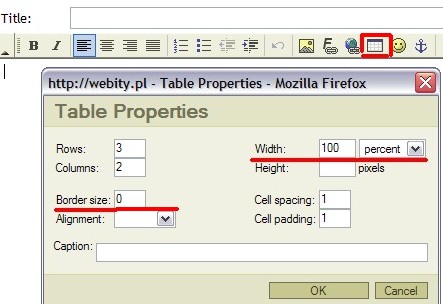
Insert tables into the page using the text editor - use of the Insert/Edit Table icon right from the list of icons.
- Set the number of lines and columns according to your needs.
- Table width - if you enter 100%, the table will be flexibly extended to the total width of the page. Try entering 90% or 80% or 450 pixels, for example.
- Border = 1 (the table will have a soft border)
- Border = 0 - the table won't have any grid-like border
If you create a table, you can either enter the data manually into the cells, one after the other, or using the Ctrl+C keyboard shortcut.
You may change the table properties as follows:
- use the mouse to highlight the table cells you wish to alter.
- click on the highlighted part with the right mouse button. The table related context menu will appear. (like insert/ delete line, insert/delete column, etc.)
- alternatively, you may change the settings of the whole table - change the border, width, etc.
Functions
| Webity Start |
Webity Standard | Webity E-shop |
Webity.eu - create a website, or advanced e-shop in less than 5 minutes. Free trial. Content management system, online website builder, create a web page, web design, e-shop, eshop.